Today’s post is the start of a “mini-series” where I’ll document how I’m working with some different APIs for custom reporting. Today’s post is about Harvest, an app I use for time tracking and billing. This series is aimed at users who may have similar requirements to mine, which was pulling data out of different application APIs for analysis in Power BI and/or Excel. In my limited experience, I’m finding significant differences in how to connect to them or how to paginate through them and I wanted to share my learning on this in case it helps others!
For this post, I will describe the following items:
- Getting a Harvest’s API v2 Personal Access Token
- Authenticating with that in Power Query (Power BI or Excel)
- Using the “GET” method on the Time Entries endpoint from the API
Some of the concepts I will cover should be similar regardless of which endpoint(s) are used (at least in the context of the Harvest API). The API documentation is the reference to what methods are available, what fields will be returned, what data types they contain and what types of query parameters are available.
Getting a Personal Access Token
To get started, set up or get a Personal Access Token first. This is how to authenticate when pulling data for yourself (which is my use case). For broader reporting and/or other uses other than “getting” data, I would recommend using OAuth2 to authenticate. That being said, I haven’t tried it so I can’t comment on how that works! 😉
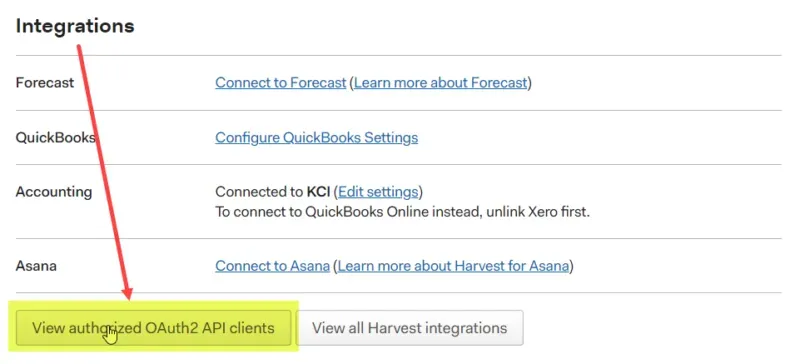
Step 1 – go to the Integrations section in Settings
Go to the Settings menu, and scroll down to the Integrations section of the page. Click on the button that says “View authorized OAuth2 API clients“. Yes, it’s a little misleading IMHO, and would be better to be called “API Authorizations” or something a little more generic.
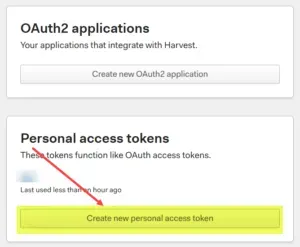
Step 2 – Click on Create new personal access token
In the next screen, click on the “Create new personal access token” button. If a token was already set up, it will be listed here too. This is where personal tokens are managed (revoke and/or copy the necessary values for authentication if needed).
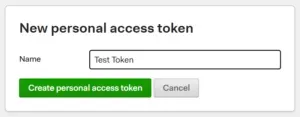
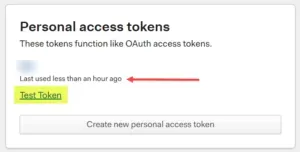
Step 3 – Give the new token a name
In this window, simply type in a name for the token. It can be initials, the application or the location where the token will be used. For this blog post, I created a new one and simply called it “Test Token”. Now click “Create personal access token“. The name of the token itself is not used anywhere that I have noticed.
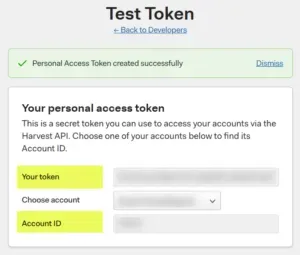
Step 4 – get the token value & account ID
The next window will show if the token was created successfully. I’ve blurred out the values in my fields. The two pieces of information required here are highlighted in the screenshot below: the value in the Your Token box and the Account ID. When there are multiple accounts in Harvest, make sure to select the proper Account ID. I only have one account myself, but it appears as if the same token value could be used for multiple accounts. Where the Account ID comes in will be apparent further in this blog post.
Result
The original “tokens” page will now show the new token name.
Important to remember: remember to revoke the token if it is no longer needed OR if it was mistakenly shared with others. Click on the link to view the settings and an option to revoke the token if needed. Remember that the API can be used to do a lot of different things other than just pull in data for reporting (referred to as “GET” methods); most APIs also allow other methods which may include adding, editing, and/or deleting data.
Authenticating to Harvest in Power Query
With the Token and Account ID values, we’re ready to get into Power Query. Here is how I have used the information to pull in Time Entries, one of the API “endpoints” in the Harvest set of APIs. For those new to APIs, think of an endpoint as a destination or target, or “what data to get”, which is timesheet history in my particular use-case. Most applications that have APIs will have decent documentation about what the various endpoints are and that’s the best place to start.
The method Harvest uses for authentication involves passing both the AccountID and Token value in the query with the request. In future posts, this is just one way an API authentication works.
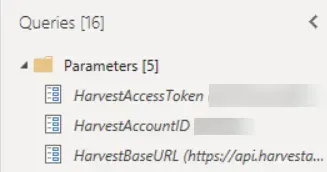
Step 1 – create some parameters (optional)
This step is optional but to pull data from more than one endpoint, parameters will make it a lot easier to “re-use” code instead of pasting the Token and Account ID in multiple queries. Also, if the token needs to be set up again, it’s so much easier to update one parameter than it is to update every query that has the value in it!
Here is an example of what I set up (all 3 are Text data types):
- HarvestAccessToken with my token string
- HarvestAccountID with my Account ID
- HarvestBaseURL with the root URL of “https://api.harvestapp.com/api/v2”.
NOTE: I’m only putting the word “Harvest” in front of my parameters because my particular use case involves combining data from Harvest and ClickUp. If I didn’t keep track of which is which in my parameter naming convention, I would risk using the wrong parameter in my queries!
Step 2 – open a blank query
It took quite a bit of trial and error to get to this point and going through the normal “get data from the web” always resulted in my not getting what I needed. So, once I figured out what I needed, I simply started copying and pasting code into Advanced Editor in Power Query instead.
In Power Query, click on New Source > Blank Query. Next, click on Advanced Editor on the toolbar to open the editor window. The code below can be copied and pasted in, with the following caveats:
- My parameters in the query are based on “my” parameter names.
- The 3 spots where this query contains a parameter are in bold: HarvestBaseURL, HarvestAccessToken, HarvestAccountID, plus the value in “RelativePath” is bold as that indicates the endpoint I am using here. That is not a parameter.
let
    Source = Json.Document(Web.Contents(HarvestBaseURL,
        [RelativePath="time_entries",
        Query=[access_token=HarvestAccessToken,
               account_id=HarvestAccountID]]))
in
    Source
The code above uses a method of pulling from a data query that separates the root URL from the supplementary (and often optional) information to get into further detail. I could get the results I wanted multiple ways but once I started pushing my Power BI report to the service and tried to use Scheduled Refresh, I was running into errors like “Data source error: unable to refresh the model because it references an unsupported data source”. Thanks to Chris Webb’s article on some of the pitfalls and how to eliminate that error by reconstructing the query using this Web.Contents method.
Code Breakdown
- Json.Document = The result I want is to convert the results to json. The value I am passing to this is the Web.Contents result.
- Web.Contents = This wraps around the base URL, a relative path if there is one, and whatever query parameters are needed to pass to that URL such as authentication headers.
- The parts in the square brackets are optional in general but necessary in my case (because I need to provide the endpoint to the URL and authentication information).
- RelativePath = the endpoint name (in this case).
- Query = passing the token and account ID in this case, and/or any other filtering needed. There is an example at the end of this blog where I take the same query and add a date filter to further refine the results.
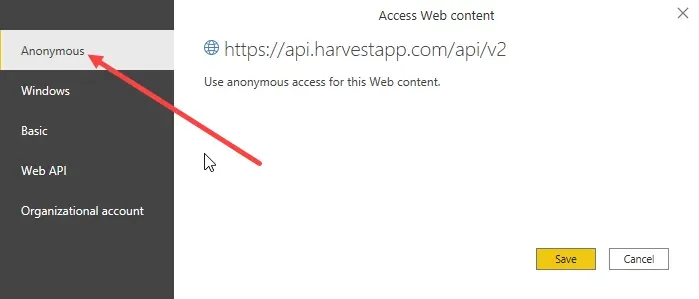
At this stage, when closing/saving this query for the first time using the token & account ID, expect to be prompted for authentication. The keys in the query are the authentication, so from the “Data Source settings” standpoint, choose Anonymous. Ignore “Web API” and any other login-based authentication as that is what the token is for.
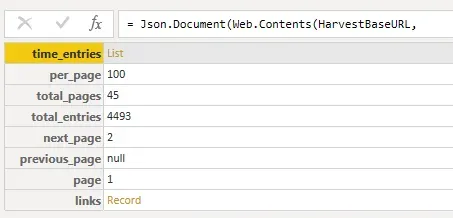
Step 3 – review the results
If the token and account ID values are valid, a result something like what’s in the screenshot below will appear (although the number of pages and entries will vary). The screenshot below shows that I have 45 pages of records (at 100 records per page) and a total of 4,493 entries!
NOTE: What is here is specific to the Harvest API and endpoint I chose to use. Not all APIs return this level of detail! From my limited experience, this is awesome! I will be writing another post where I don’t have any idea how many pages of data there are and it’s a completely different scenario to handle.
Results per page will differ across APIs, but 50 or 100 records per result appear to be a common “page size”. In some cases, APIs will allow passing in a parameter for how many records per page, but many won’t so some pagination techniques to loop through the results to get a full set of data will be required more often than not. On time_entries, the Harvest documentation states I can pass in a “per_page” parameter but the valid values are 1 to 100, meaning 100 records per page is the max.
Repeat the example with a different endpoint
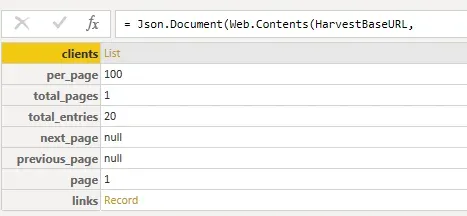
Let’s use that same code with a different endpoint to demonstrate that the initial results are the same (except for # of pages and total entries). In this case, I am changing the RelativePath value to “clients” instead of “time_entries”.
let
    Source = Json.Document(Web.Contents(HarvestBaseURL,
        [RelativePath="clients",
        Query=[access_token=HarvestAccessToken,
               account_id=HarvestAccountID]]))
in
    Source
The only change in the code above is the endpoint, in the “RelativePath” line. As long as I am continuing to use “v2” endpoints, I can just put in the endpoint name the documentation references and I will get that data back.
NOTE: All of the calls I am making are to the “v2” set of endpoints so my “HarvesetBaseURL” has the “/v2” in its URL path. There may be cases where older endpoints need to be referenced, perhaps where there is no “new” version of it. If that is the case, I would change the baseURL parameter to remove the “/v2”, and then in the RelativePath segment of the queries, add that in. For example, “v2/clients”. The total end-to-end URL needs to be the same.
NOTE 2: the “RelativePath” already accounts for the need for a slash between the “base URL” and the “Relative Path” string. On the surface, it appears as if what I am going to pass is “https://api.harvestapp.com/api/v2clients” which would be a problem. RelativePath inserts the “/” between the two pieces of text so the URL would be “https://api.harvestapp.com/api/v2/clients” in the end.
The results for the “clients” endpoint look similar to the results above for time_entries, except in this case there is only 1 page of data and 20 entries.
If looking at something that doesn’t need to get into pagination (looping through multiple pages of results), start drilling down on the values in the first row (by clicking on the word “List”), and then converting the resulting “list of records” into a table, and proceeding from there.
I won’t cover that next part in detail in this post but my tip here is to click on the word List on the “clients” row, which will then show a list of records (20 records in my case). Now that we have “records”, click on Convert to Table on the toolbar and click OK on the delimiters prompt. Lastly, expand the values in Column1 and a table of data will be returned to transform further from there.
Don’t be afraid to click on any of the hyperlinks in the results, even on an individual record, to see what the underlying data looks like. It’s easy in Power Query to back those steps out, and it’s a quick way to get a feel for what data is being returned without breaking anything.
One last example: additional query filters
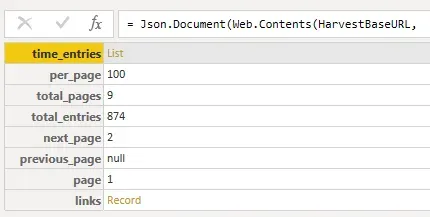
If I go back to the original example, time_entries, my results were 45 pages of data and 4493 records. I’ve been using Harvest for years and I simply do not want the query to take forever reading an increasing number of records only to then filter out the majority of the records afterwards. In other words, I want to filter what I get back before I start to transform the data further.
Here is the code I used to do that, with a new parameter that I didn’t show in the screenshot above. I want to filter timesheet results to just a certain calendar year. I use a ReportYear parameter (text format) to create a StartDate and EndDate variable for use in the filters on the query.
let
    StartDate=Date.ToText(#date(Number.FromText(ReportYear),1,1)),
    EndDate=Date.ToText(#date(Number.FromText(ReportYear),12,31)),
    Source = Json.Document(Web.Contents(HarvestBaseURL,
        [RelativePath="time_entries",
        Query=[access_token=HarvestAccessToken,
               account_id=HarvestAccountID,
               from=StartDate,
               to=EndDate]]))
in
    Source
I’ve added 3 new things to the query.
- In line 1 after “let”, I put in two variables (StartDate, EndDate) to create a date based on my parameter ReportYear.
- On the last row before “in” there are now 2 more “Query” values: “from=StartDate” and “to=EndDate”. “From” and “To” are parameters identified in the Harvest API documentation that filter the results to on/after and on/before the from and to dates specified.
How did I know what to put in there?
What parameters are possible is based on the API documentation. The Harvest time_entries documentation lists several parameters I could pass in. The syntax will be specific, for example: “from” is a specific parameter per the documentation, that will return time entries on or after that date, and it must be a date value. I can’t say for sure whether “from” is the term the API would expect from the other Harvest endpoints but that’s the value to use for time_entries.
The results of the filtered query look like this: I’m now down to 9 pages instead of 45 pages, and 874 records instead of 4,493.
Summary
That’s it for this post, which is lengthy enough as it is. In the next post, I will talk about pagination in the context of looping through the results one page at a time to get all 9 pages’ worth of data! After that, I will dive into the ClickUp API as the results they return are not as “friendly” as what Harvest returns.