This post is the 3rd in a “mini-series” where I’m documenting how I’m working with some different APIs for custom reporting. Today’s post is about ClickUp, an app I use for managing projects. Unlike the Harvest APIs I covered in posts 1 & 2, ClickUp’s API is a little more challenging to deal with as there are no indicators about several records or several pages in the results so I need to do something a bit different than I wrote about previously. I’ll cover this in more detail in the next post.
The previous posts in this series are:
- Connecting to Harvest in Power Query
- Pagination in Power Query (Part 1 – dealing with a known number of pages)
For this post, I will describe the following items:
- Getting a ClickUp Personal Token
- Authenticating with the Personal Token in Power Query (Power BI or Excel)
- Using the “GET” method on the Spaces endpoint from the API
Some of the concepts I will cover should be similar regardless of which endpoint(s) are used (at least in the context of the ClickUp API). The API documentation is the reference to what methods are available, what fields will be returned, what data types they contain and what types of query parameters are available.
Getting a Personal Token
To get started, get a Personal Token first. This is how to authenticate when pulling data for myself (my use case). For broader reporting and/or other uses other than “getting” data, I would recommend using OAuth2 to authenticate. Like the Harvest API post, I haven’t used OAuth2 so I have no idea how it works.
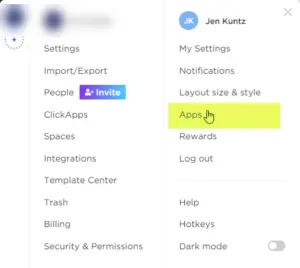
Step 1 – go to the Apps section in the user’s personal settings
Go to the Settings menu (bottom left-hand side of the page) and click on Apps under the user settings section, not the company settings section.
Step 2 – generate an API token
In the next screen, I already have a token and cannot remember what is here initially. My best guess is it either already was populated or there was a Generate button to initially set the value. There is only one personal token, so either way, that’s all that is needed to get going.

Important: remember to regenerate the token if it is no longer needed OR if it has mistakenly been shared the Token Value with others.
Authenticating to ClickUp in Power Query
Here is how I have used the information to pull in Spaces, one of the API “endpoints” in the ClickUp set of APIs. As I mentioned in my mirror post on Harvest, for those new to APIs, think of an endpoint as a destination or target, or “what data to get”. I pulled a few separate queries from ClickUp – tasks and spaces to name a couple of things.
The method ClickUp uses for authentication involves passing the Token value in the authorization header with the request. My mirror post to this one re: Harvest shows a slight difference in the core query to handle this.
Step 1 – create some parameters (optional)
This step is optional but if there is a need to pull data from more than one endpoint, parameters will make it a lot easier to “re-use” code instead of pasting the Token in multiple queries. Also, if or when the token needs to be regenerated, it’s easier to update a parameter vs. updating multiple queries.
Here is an example of what I set up (all are Text data types). Ignore the top 4 parameters, those are from the previous posts relating to Harvest and a generic ReportYear parameter. The relevant parameters are:
- ClickUpTeamID with my TeamID
- ClickUpBaseURL with the root URL (https://) “api.clickup.com/api/v2”
- ClickUpAuthHeader with my token value
NOTE: I’m only putting the word “ClickUp” in front of my parameters because my particular use case involves combining data from Harvest and ClickUp, so I need to differentiate them.

Step 2 – open a blank query
In Power Query, click on New Source > Blank Query. Next, click on Advanced Editor on the toolbar to open the editor window. The code below can be copied and pasted in, with the following caveats:
- My parameters in the query are based on “my” parameter names.
- 3 parameters may need replacing if the names change: ClickUpBaseURL, ClickUpAuthHeader, and ClickUpTeamID.
- In this particular endpoint, it requires a TeamID so the RelativePath is a concatenation of things to make up the remaining elements of the URL for the space endpoint.
let
    Source = Json.Document
      (Web.Contents
        (ClickUpBaseURL,
          [RelativePath="team/"
           & ClickUpTeamID
           & "/space",
           Headers=[Authorization=ClickUpAuthHeader]]))
in
    Source
There are some subtle differences between this query and the Harvest query in my first post in the series.
- The Harvest query passed authorization as a query parameter, like any of the optional parameters that could be passed with it. ClickUp requires an Authorization Header. The “Headers=” part here wasn’t in the Harvest example.
- Most of the queries I use in the ClickUp API require passing a TeamID. The easiest way to find out what the TeamID is is to look at the URL of the home page in ClickUp.

The code above uses a method of pulling from a data query and it’s the same methodology used in the previous post (post #1 of the series).
Code Breakdown
- Json.Document = The result I want is to convert the results to json. The value I am passing to this is the Web.Contents result.
- Web.Contents = This wraps around the base URL, a relative path if there is one, and whatever query parameters I need to pass to that URL such as authentication headers.
- The parts in the square brackets are optional in general but necessary in my case (because I need to provide the endpoint to the URL and authentication information).
- RelativePath = the endpoint name (in this case).
- Query = ** In this endpoint, I have nothing to filter but this section will be in the tasks example later.
- Headers = This is the authorization header. Similar to the Query section, the values here need to be within square brackets.
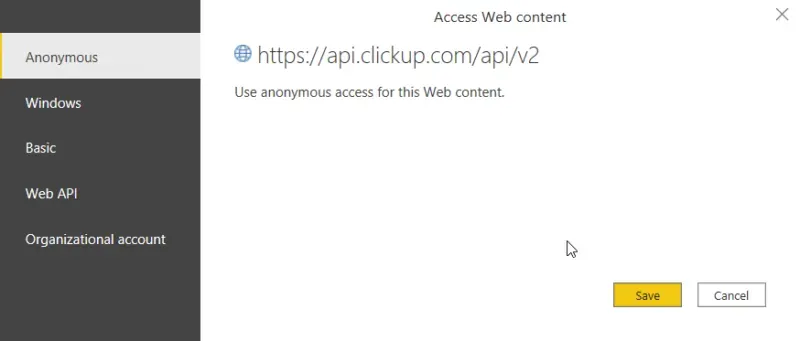
At this stage, when I close/save this query, if this is the first time using my token, I will be prompted for authentication. The token is the authentication I need, so from the “Data Source settings” standpoint, choose Anonymous. Ignore “Web API” and any other login-based authentication as that is what the token is for.
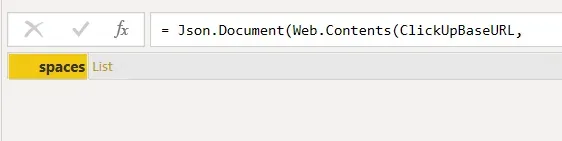
Step 3 – review the results
If the token and team ID values are valid, I would get a result something like what’s in the screenshot below. In comparison to the Harvest post, a big difference is there is NO detail returned here to give us a clue as to how many spaces I have. The result below will be identical whether I have zero spaces, 1000 spaces or anything in between.
Repeat the example with a different endpoint
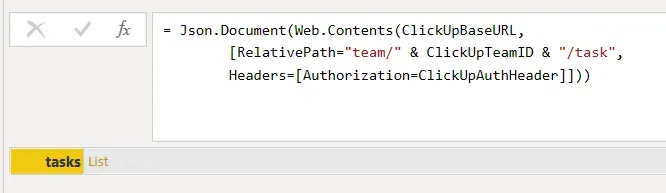
Let’s use that same code with a different endpoint to demonstrate that the initial results are the same. In this case, I am changing the RelativePath value to “task” instead of “space”. The task endpoint I’m using also uses the TeamID as part of the URL so it’s nearly identical to spaces.
let
    Source = Json.Document(Web.Contents(ClickUpBaseURL,
        [RelativePath="team/" & ClickUpTeamID & "/task",
        Headers=[Authorization=ClickUpAuthHeader]]))
in
    Source
The only change in the code above is the endpoint, the end of the “RelativePath” line.
NOTE: All of the calls I am making are to the “v2” set of endpoints so my “ClickUpBaseURL” has the “/v2” in its URL path. There may be cases where older endpoints may need to be referenced and if that is the case, I would change the baseURL parameter to remove the “/v2”, and then in the RelativePath segment of my queries, add that in. For example, “v2/team/(etc.)”. The total end-to-end URL needs to be the same.
NOTE 2: the “RelativePath” already accounts for the need for a slash between the “base URL” and the “Relative Path” string. It inserts the “/” between the two pieces of text so the URL would be a “proper” endpoint URL.
The results for the “tasks” endpoint look identical to the spaces result above.
One last example: query parameters
Here is one last example of the Tasks query with some additional fine-tuning. In the example above, there is no Query= section to the code. The below has that to show where it fits with the Headers= section.
let
    Source = Json.Document(Web.Contents(ClickUpBaseURL,
        [RelativePath="team/" & ClickUpTeamID & "/task",
        Query=[include_closed="TRUE",
               subtasks="TRUE"],
        Headers=[Authorization=ClickUpAuthHeader]]))
in
    Source
The root query is the same as earlier in this post, and a Query=[ ] section has been added before the Headers=[ ] section.
- The first parameter is to indicate I want to include closed tasks.
- The second parameter is to indicate I want to include subtasks.
How did I know what to put in there?
What parameters are possible is based on the API documentation. The ClickUp API “Get Filtered Team Tasks” documentation lists several parameters I could pass in. The default for both parameters I passed in is FALSE so if I did not include those parameters, I would get tasks that are not in a Closed status and I would get Parent tasks only.
Summary
That’s it for this post. In the next post, I will talk about pagination in the context of looping through an unknown set of pages for a query like Tasks that typically will return multiple pages of results.