Pretty soon I’ll have to be more creative with the blog post titles! Part 193 …. geez.
More stuff I’m learning: it’s way easier to install and configure Active Directory Domain Services on Azure than installing SQL Server 2014 fresh on a Windows-only VM. Seriously… I’m on my 3rd attempt to install SQL Server!
In my last post, part of the What’s Next was creating a standard VM, installing A/D on it and installing SQL Server on it. This is not and never will be anything close to a production machine, so the significant faux-pas of having SQL Server on a Domain Controller seems like an acceptable risk to me. Since I have test & development licenses, instead of paying by the minute for the license, I figured I should be able to start with a standard Windows O/S VM on Azure and go from there. Of course! It’s not that easy…
Step 1 was to create a second VM. In creating this second VM and attempting to configure a static IP address for the Domain Controller, I realized I set the first machine up incorrectly… and didn’t know it. So here are some tips for those who are planning on trying this. Be warned, I’m not an expert on this and I’m only blogging about this to hopefully help some poor soul who might want to create a simple test environment for themselves, but are also technically challenged on networks and other non-GP things!
Creating another VM for a Domain Controller
Note: I didn’t get a lot of screenshots during this stage because I thought it was similar to what I’ve already documented in previous posts. Here roughly are the steps I followed:
- Create a new VM from the gallery, this time Windows Server 2012 R2 Datacenter edition.
- Went through the steps as I documented in Part 1 of this series to create that VM and start it
- Started to follow the steps in this blog about how to set up a new forest in Active Directory on Azure. I neglected to follow this religiously as it seemed to describe things I thought I already knew! (What is that about a little knowledge is a dangerous thing?!)
- Attempted to use the Azure Powershell command he indicates to set a static IP address. It didn’t work for me. When I googled the error, it said this VM is not a part of a Virtual Network, and if it is not a part of a Virtual Network, then I can’t exactly give it a static IP address! In my head I was thinking “But, I created a Virtual Network already!”. Yes, I did, but I didn’t associate it with the VM.
Where it went off the rails
In my Part 1 blog, I correctly created a Virtual Network. What I didn’t know was I needed to create the VM and “put” it on that Virtual Network. Since I was only using one machine, it did not affect my machine, therefore I thought I was home-free.
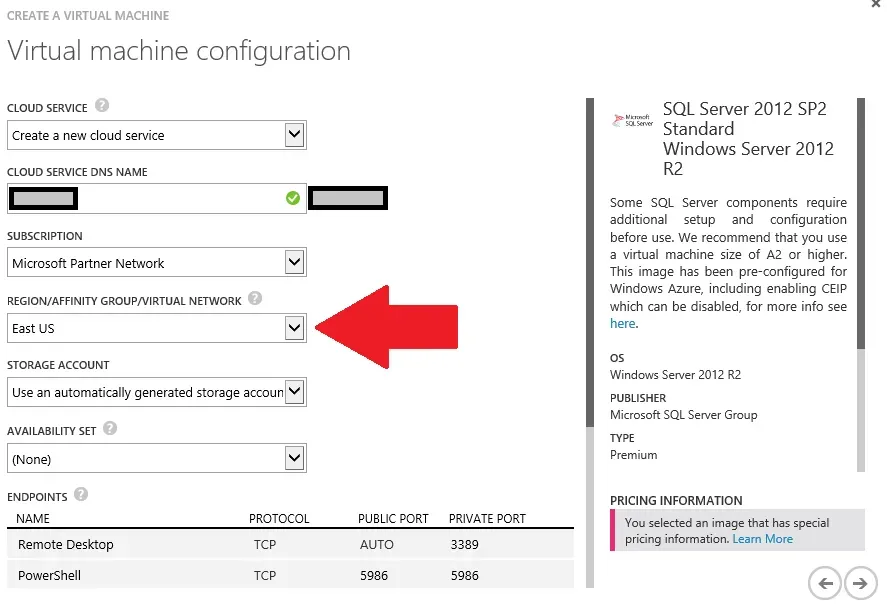
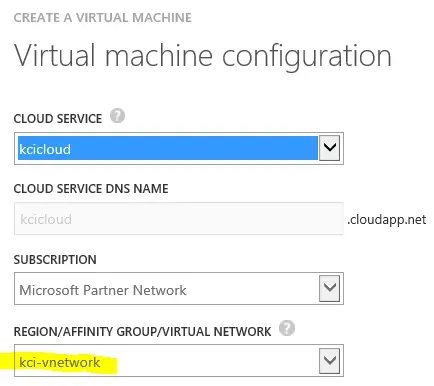
What I should have done: on the 2nd “Virtual Machine Configuration” screenshot, shown below with an arrow indicating where I went wrong, is where I was supposed to select the Virtual Network name, not the region. This is the screenshot from my first VM (note the right side says it’s a SQL Server VM). Because this was my first VM, it was a new Cloud Service, not doing this means I can’t associate my existing VM with the Virtual Network, nor any future ones on that Cloud Service. I’ll come back to this later on in this post…
Re-creating a VM from an existing disk
The issue, once I found it, isn’t fixable but thankfully I didn’t have to start completely over, just semi-start-over. Mistakes = Experience right?
When deleting a VM, it asks if I want the disk(s) deleted or kept. In this case, the VHDs were fine, it’s the Virtual Image that is the issue. So, keep the disks, and re-use them. That way any configuration on the new VM that work isn’t lost.
I went back through the creating a new VM step, from the Gallery, and at the bottom chose “My Disks”. Note: it takes a good 5 minutes or more for the now-orphaned VM disk(s) to appear in the My Disks section. This, by the way, is also where I would find uploaded VHDs if I were creating new VMs from custom VHDs that I upload.
Since I didn’t get a screenshot as I did it, this will have to do. The disk will have some system-generated name when it appears there. Just be patient and keep checking until it appears, then continue with the normal steps of creating a VM.
Now the next most important thing: choose the virtual network! Here’s the kicker:
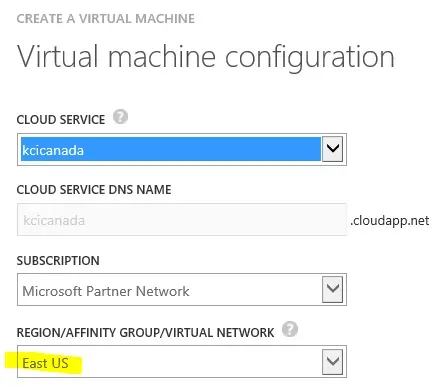
- If there is a previously created cloud service that wasn’t associated with a virtual network, it can’t be used: the drop-down list is greyed out and a region is listed. Picture 1 below, my original cloud service name choice, results in a greyed-out Region/Affinity Group/Virtual Network selection box.
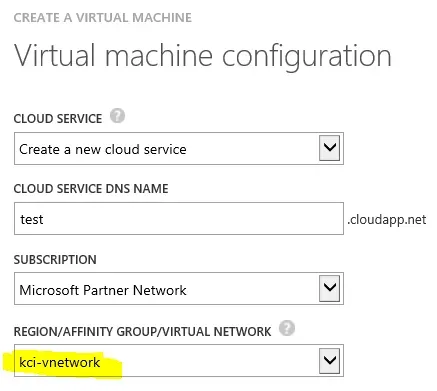
- I needed to let it create another cloud service so that the drop-down list is usable and allows me to pick a virtual network. Picture 2 below, choosing “Create a new cloud service” allows me to use the Region/Affinity Group/Virtual Network selection box.
- Once a cloud service is associated with a virtual network, the next machine created, when picking that cloud service name, automatically associates it with the virtual network. Picture 3 below, my new cloud service name, and again non-editable Region/Affinity Group/Virtual Network selection box but it’s tied to my Virtual Network so all is good.
So, my question at this point is: what the heck is the difference between a Cloud Service and a Virtual Network? They are tied together, either a Cloud Service has a Virtual Network or doesn’t and can’t be altered or have both. I’m sure I could google that and get the answer… someone else can do that part. It doesn’t matter now that I know Cloud Service and Virtual Network are siblings!
Installing Azure Powershell
The next step now that I have a VM, intended to be used as a Domain Controller, is to assign a static IP address.
And of course, it’s done differently than on Hyper-V… the biggest thing: don’t manually change the network adapter configuration to set it to a static value. Use Azure Powershell to set a static IP address which is basically – if I understand this correctly – a reservation like one would use on a router, to “kind of” guarantee that this machine keeps the same IP address every time it is booted up. That also includes after it’s stopped and de-allocated, which is what I do. This works like a charm.
To do that, use Azure Powershell. Go here, find the link under How to: Install Azure Powershell, install it and open it up. I have barely used Windows Powershell so other than the fact it resembles Command Prompt to me, that is about all I know. I managed to get this static IP set by relying on other blogs and articles to assist me.
First: connect Azure Powershell to the Azure Subscription. The link above will walk through the steps to connect. I’ve used both ways of connecting – the Azure AD method and the Certificate method. Both work fine and are pretty straightforward. Watch out while typing, the cmdlets are a little lengthy at times so typing them accurately is the key. They do not appear to be case-sensitive though…
Setting the static IP address
Using Azure Powershell, run the following command (from the same article on creating a new forest). The parts with “MyXXX” are where to insert your own values.
What IP to use? When I created my Virtual Network, I configured 1 (or more) Virtual Network Address Spaces. If I go into Configuration in my Azure portal, for the Virtual Network, I would see the Usable Address Range. I selected the first IP address available to be my domain controller static IP.
Get-AzureVM -ServiceName MyAzureCloudServiceName -Name MyAzureVMName | Set-AzureStaticVNetIP -IPAddress x.x.x.x | Update-AzureVMThis seemed to work just fine after I got past the initial errors relating to my VM not being part of a virtual network.
After this, I continued to follow the steps recommended in the New Forest article above and installed Active Directory Domain Services. This part I won’t document purely because I am not an expert here.
The last tip: Don’t change the network adapter to the static IP address! Let Azure use DHCP to assign IP addresses. By running that cmdlet in Powershell, I have given this machine an IP reservation which works fine.
At the end of this once the machine is promoted to a domain controller, go to Virtual Network configuration in Azure portal, and set the DNS Server to this machine’s new static IP. That tells the virtual network which machine to use.
Next Problem: no external internet access
Shockingly, the next problem I had was not being able to access the internet, for Windows updates or anything else. I am not sure if how I resolved this is technically the best way to resolve it but here is what I did:
- I logged into my new VM, using my domain credentials.
- I went to Command Prompt and typed in ipconfig /all to get the list of IP addresses on my server
- Scroll down to DHCP Server and it’s an external IP address. Write this down.
- Go back to the Virtual Network DNS settings in the Azure portal, and add this to the DNS server listing as well as the domain controller’s IP.
That worked for me. YMMV. There were a lot of articles about not having external internet access from a domain controller and eventually I found one that gave me this tip and it worked.
Installing SQL Server 2014 Standard
As is often the case, the part I thought might be hard, was easy enough, and the part that I thought would be a no-brainer, was hard. As I write this, I started writing nearly an hour ago and I was on to my 3rd attempt at installing SQL Server. Normally it’s a pretty easy task!
It failed and I failed to grab the error message, but everything installed successfully except the Database Engine Services. It was late at night when I first tried so I didn’t feel like figuring it out right then.
Today, I took another crack at it. I uninstalled and reinstalled just the database engine piece. Didn’t get a screenshot but the error text was “wait on the database engine recovery handle failed”. Same error as a couple of days ago. I google the error and get a couple of things to try. In perfect “do what I say, not what I do” fashion, I tried 2 things at once to resolve the issue and it worked. Which one fixed it? I have no idea! LOL… yes I do troubleshoot for a living and normally I try fixing one thing at a time. Ya, well…
Here’s what I did:
- Run the SQL Server setup as Administrator. Even though I *am* the administrator. Duh. I never understand this …
- Set up an active directory user for the SQL Services, instead of using the default service accounts.
- Oh ya, and made sure this VM was set to Canada in Regional Settings so I didn’t have to mess around with SQL Server Collation issues again! (see Part 2 of my series for that fun experience!)
Because this is a test server (have I said that enough times yet?), I wouldn’t normally set up service accounts, I pretty much install standard defaults with SQL except of course making sure it uses Mixed Mode Authentication. But this time, not wanting to install a 4th time if “Run As” wasn’t the problem, I decided to also create service accounts for the services.
What’s Next?
Here are some things I plan to do next:
- Re-install GP 2015 and do a server move from my first VM to this VM. I probably won’t blog about this since it’s fairly ho-hum.
- Install Management Reporter and migrate my FRx reports to MR
- Delete my original VM once this proves to be a working solution, assuming no issues
There might be one more article in this series to wrap up and let the machine run for a few days to see what it costs me over more than minimal use. Otherwise, I’ll post as I find new things on Azure that I figure are worth sharing!
Previous articles in this series
- Part 1 – how this series started, setting up an Azure subscription, step-by-step how to set up a virtual network and VM
- Part 2 – change of approach, connecting to a VM, copying files, SQL config changes for GP, SQL collation problems when copying in my previous GP data, cost update
- Part 3 – cost update and details on how the charges are derived, performance to date, the Temporary storage, printing & GP upgrade
- Part 4 – cost update, RDP settings & local drives, VM sizes, Free Trial recommendation
- Part 5 – cost for the first month and what’s next plans