The last couple of #TipTuesday posts have been around some older “new” features – copy journal entry and backout/correct journal entry. Today I thought I would write a quick tip post around one of the lesser-known options for creating journal entries in Dynamics GP: quick journals. Next week for my last #TipTuesday of the year, I’ll have a post about the other option which is clearing entries.
What is a Quick Journal?
Quick Journals are a type of journal entry template, where the account numbers for common journal entries are set up in advance in a template, with a default offset account.
Default Offset Account? What does that even mean?
This may be “new” terminology for users who have not used a Quick Journal before. An Offset Account is a GL account where the ‘balance’ of the journal entry will be posted.
Take an accrual for instance: the obvious choice for the offset account on an entry for accrued liabilities would be the Accrued Liabilities account. The template itself would list all of the other GL accounts typically being accrued, and it would not list the Accrued Liabilities account, since that would be the offset. Then, during the actual entry, the user merely enters in the amounts for the “debit” side of the accruals and the credit is the balance to Accrued Liabilities.
Quick Journal Setup
First, to use Quick Journals, there is a setup window to create the “template”. It’s under the Financial page > Setup > Quick Journal. Each Quick Journal has an ID and description. The Journal ID becomes the batch when the Quick Journal is posted so I would recommend using somewhat meaningful names for the IDs, as much as the length of the field allows that is. The description is used only for reference by the user when selecting a Quick Journal ID from the list, during transaction entry.
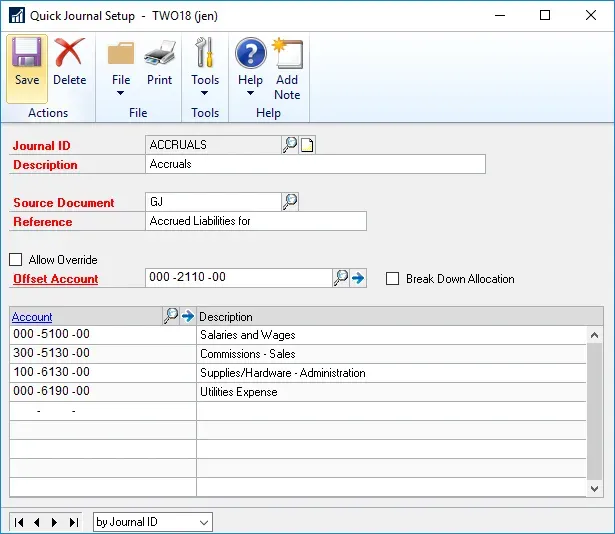
The next two fields are the default Source Document and Reference fields for the journal entry. This is very handy if there are unique source documents for any purpose as the user would not need to remember to change it.
For reference, the tip I usually gave to my clients was to think about the description the user may want on the resulting journal entry, and if they typically would add a month or period name, do something like I show above where I leave the end of the reference blank for editing during use.
Next, select the Offset Account. Note that the field is required, both in the setup and in use in the Quick Journal entry itself. If the type of entry in mind wouldn’t always use the same offset, then mark the Allow Override box, to allow the end user using this ID to change that GL account if and when required. There are going to be instances where it should never be overridden and others where it is often overridden, so plan accordingly when creating the IDs to have controls where they are needed. Beside the Offset Account is the Break Down Allocation account option, which would display (“preview”) the results of what the allocation account would be when posted, on the edit list or posting journal.
Finally, the entry itself is in the line item detail section of the window. This is where users would list the various GL accounts that could be used in this Quick Journal. A user can add more GL accounts during entry as well as leave some accounts blank (zero $) during entry so the choice is about efficiency: is it better to list off the accounts that are most likely to be used or all accounts so the user has to scroll through a longer list? All I would recommend is to put the accounts in an order that makes sense for the journal entry. It’s intended to make it easier to record journal entries so why not think about the order the accounts are listed here in the first place?
Using a Quick Journal
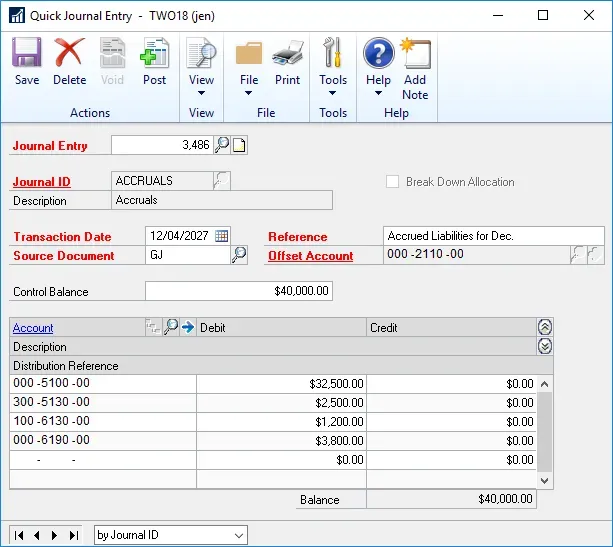
Once one or more Quick Journal IDs are set up, the way to use them is via the Financial page > Transactions > Quick Journal. Quick Journals use the same Next Journal Entry number as standard journal entries. Select a Journal ID from the lookup, and the values from the setup are brought into the window as displayed below.
In the example below, I had not marked Allow Override on the Offset Account in setup, so the account is greyed out. To record my entry, I simply type in everything else I want in my accrual example, and I put in the amount in the Control Balance field. At this point, I can save it (but not in a “batch” that I create) or I can post it. There are no traditional batches to review like there are with regular journal entries. More on this to come…
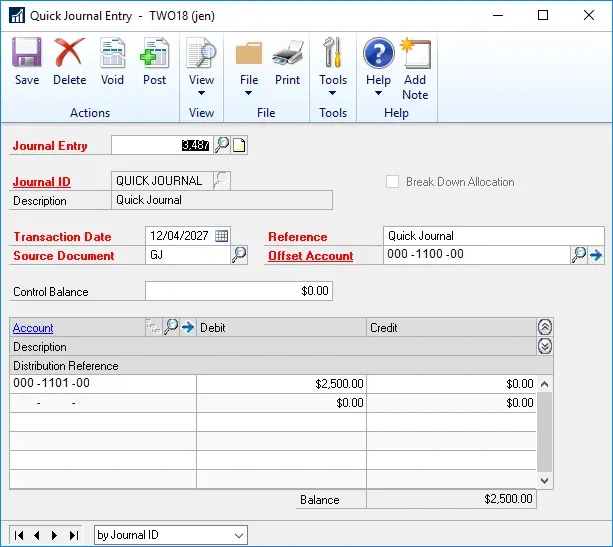
The next example is what the Quick Journal Entry window looks like if Allow Override is marked in setup: it’s now changeable by the user creating the entry.
Some gotchas…
There are some quirks to Quick Journals! I believe they have their uses, but they have some odd qualities that are things users may not realize until they play with them for a while.
No batches, but entries can be saved!
As I mentioned above, once I enter what I want, I can save the entry or I can post it. Saving it is seemingly putting it into “no man’s land”, however, they are saveable and thus there is a chance for some segregation of duties if I wanted users to enter but not post Quick Journals.
Saved entries are visible in Series Post but not Batch Entry
To continue on the segregation comment above, security could be defined to allow users to enter & save Quick Journals but not post them (theoretically) and then someone else could be posting them from the Series Post window. The flaw in this plan would be there is no great way to get edit lists, which would be the traditional workflow for many organizations (the user enters transactions in a batch, someone reviews an edit list and posts the batch). If I were to try this, I would likely create a Financial Transaction SmartList to review unposted Quick Journal entries instead of a single batch edit list I might expect from other modules.
Edit Lists are weird
So, at first glance, it seems like I can’t print an edit list. After all, there is no “batch”. However, if I save an entry, and then re-select it, there is a Print button on the Quick Journal entry window where I can print an edit list. And get this: since the Quick Journal ID is the batch ID, if I have entered and saved multiple Quick Journals with the same Journal ID, the edit list will show all of them. Yes, that’s what I call a little weird. Otherwise, there is no way to print an edit list for a bunch of entries that use different journal IDs. Strange but true.
Transaction balance cannot be zero
Here’s one error message a user could get if they mistakenly created a Quick Journal with the intent of having a balanced journal entry. If I were to create an entry where the detailed lines contained a net-zero balance, so that there is nothing for the Offset Account, I would get this error message: “The transaction balance cannot equal zero.”.

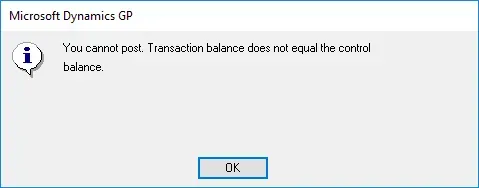
Control Balance must match, or be left empty (zero)
The last of the oddities is the Control Balance field on the Quick Journal Entry window. It’s not required, or is it? Well… it’s been a while since I’ve used Quick Journals and I’m testing/writing this with GP 2018. I don’t recall it working this way but here goes: I can leave the Control Balance at zero and it will allow me to post the entry OR the Control Balance must be the amount that will hit the Offset Account. This error text if it doesn’t match, would say “You cannot post. Transaction balance does not equal the control balance.”.
So…. naturally I wonder why one would bother entering a Control Balance if I don’t have to. Hmm… things I’ll likely never find the answer to. I realize that having a user go through specific steps of entering a control balance and then typing in the amounts for the entry itself does enforce a certain amount of rigour in the process and there is value in that, I just don’t know how many departments work that way in reality these days.
That is all I can think of to write about the unique option we have called Quick Journals! Enjoy!