Today's #TipTuesday post is around writing off small customer balances. Year-end is a great time to perform some clean-up tasks (if it's not part of normal monthly or quarterly processes. This post will cover the default Dynamics GP "Write Off Documents" process that makes this one very easy.
Overview
The Write Off Documents window is where users can write off outstanding positive or negative balances on a customer's account. Specifically, a Writeoff Debit memo or Writeoff Credit memo will be automatically created and applied to the outstanding documents marked in the process.
I recommend using this as it's a controlled process, where fewer errors are likely to be made, as the system is filtering records based on configuration options (i.e. controlling what customers can have write-offs and up to what limit). Also, the system is crediting or debiting the customers that have unapplied balances meeting the criteria defined, which means fewer chances for typos on either the customer ID or the dollar amount, whether creating a manual Debit Note or Credit Note, remembering to apply it etc.
Setup
A few things need to be enabled for this to happen, which requires a review of some basic configuration.
Receivables Setup - document numbering
Go to the Sales navigation pane > Setup > Receivables > Options button.
In this window are options for Next Number settings on Writeoff Debit Notes and Writeoff Credit Notes. The default document numbering is long and most clients want to edit the numbering pattern to make it shorter if nothing else.
Customer Writeoff settings
The customer itself must have a setting of Unlimited or appropriate Maximum Writeoff amount for this to work. If customer cards are set to Not Allowed, which is the default setting, those customers will not be visible in the Write Off Documents window.
The setting on a customer is on the Sales navigation pane > Cards > Customer > Options button and the choices are to allow unlimited writeoffs or set a max dollar amount.
The other alternative, if using Customer Classes, is to make the necessary change on a customer class and roll that down to customers in that class. That setting is on the Sales navigation pane > Setup > Customer Class > Options button.
Writeoff Accounts must be set
There must be Write-offs and Overpayment Write-offs accounts set for this to work, as the process is automatically creating transactions, where users can't enter a GL Account in the transaction before posting. They can have a different account for underpayment write-offs (i.e., bad debt expense) vs. overpayment write-offs.
There are a few options on where this can be set up, depending on how a GP company is configured.
- Company Posting Accounts (Admin navigation pane > Setup > Posting > Posting Accounts)
- Customer Class (Sales navigation pane > Setup > Customer Class > Accounts button)
- Customer Maintenance (Sales navigation pane > Cards > Customer > Accounts button)
Process
Go to the Sales navigation pane > Routines > Write Off Documents.
Users can choose to write off either Underpayments or Overpayments, as well as whether they want to create one write-off per customer or document. Example: if a customer has short-paid 2 invoices, is the desired outcome to create 2 write-off debit notes, 1 per invoice, or 1 lump sum for both amounts?
A write-off dollar limit needs to be specified. Here I normally would suggest something small, if the intention is truly to write off tiny balances. Whatever the threshold is, $1.00, $5.00 or higher, type it in and it will only look for documents of that amount or smaller AND the customer's Maximum Writeoff Amount must be higher than the amount to be written off.
If searching for specific customers only, users can enter a range of customers by ID, Name, Class or User-Defined 1 field values. For Underpayments, they have a choice if they use National Accounts to create the write-off from the Parent or the Child.
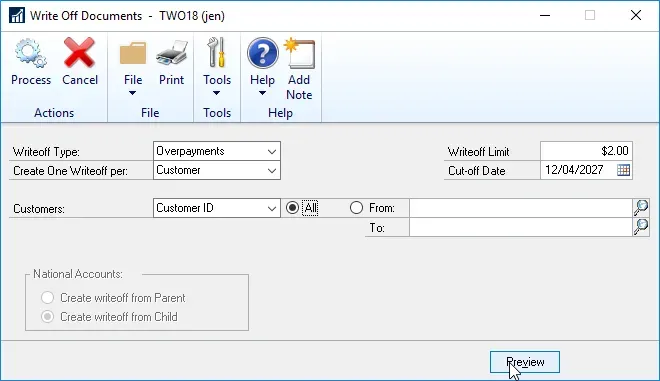
Click on Preview, at the bottom of the window, to view what customers & documents have balances that fit the criteria.
At this point, use any of the hyperlinks to drill back into more information on anything in the preview. Drilling in opens up different inquiry windows where amounts can be verified as needed. Mark or unmark records to finalize which customers will be affected. Whatever is marked will be processed. What the process is looking at is the unapplied amount of a document, not the customer's balance, to determine if something meets the write-off criteria.
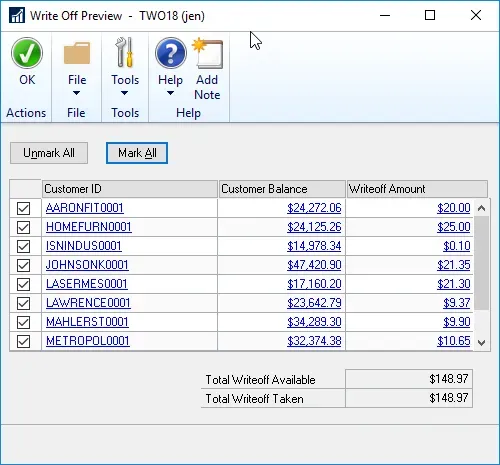
Once the preview window is closed, click Process to proceed. The user will get a Discounts/Writeoff Journal printout etc. and the documents will be created, posted, and applied automatically.
Whether these transactions are posted TO or THRU the General Ledger will depend on the Receivables Apply Doc. posting settings, which is on the Administration navigation pane > Setup > Posting > Posting (Series = Sales).
If this is a new process, I highly recommend trying it in a test company first, especially if the default settings don't align with settings that need to be changed.
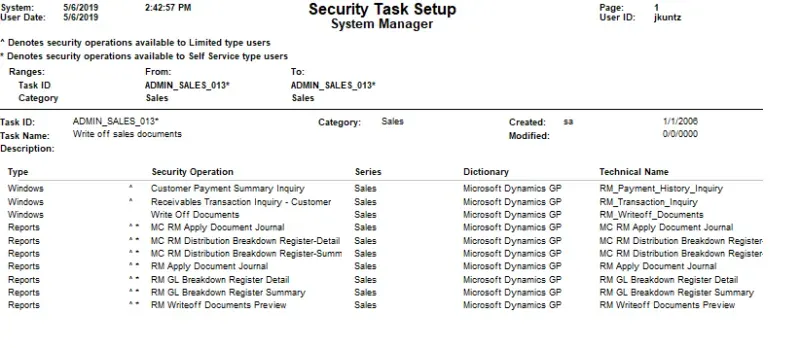
Security roles/tasks needed
*Update May 2019, as a result of a question in the comments. A reader asked what security is required to do this. The out-of-the-box task for this is ADMIN_SALES_013*. In the case of that not existing in the environment (perhaps deleted by accident), here is a screenshot of the specific windows & reports assigned to it, from my sample environment. Someone would be able to use this to re-create the security task if need be, and then assign this task to the appropriate security roles as needed.