I’m a bit behind in my blogging lately, time to catch up a little bit! Today I’m digging into some of the lesser-used items on the toolbox, and finishing this topic up next week. How can I tell these tools are not used much? The answer is simple: I’ve seen a lot of ugly reports – fields formatted poorly or not lined up with the header fields they match up to, etc.
I do cringe when I see simple things like a block of address fields (for instance) not aligned when there are tools there to eliminate this issue forever.
So far, I’ve gone through several things relating to Report Writer, most of which are aimed at an audience of new Report Writer users. This is likely the last two posts of the “starter” topics that I plan to cover unless something interesting comes up! There are lots of blogs out there on FAR more advanced topics, which I will point people to shortly, instead of reinventing the wheel and writing articles on topics already out there.
Today’s Focus
Most of this article is focused on two areas: the Arrange tab of the toolbox, and then the next article will be some notes on Drawing Options.
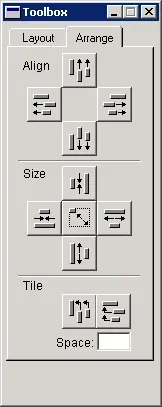
The “Arrange” tools
There are a few tools on this tab. It is the second tab on the toolbox in the Layout view of Report Writer. CTRL+B opens the toolbox if it is closed. By default, the Layout tab is always visible and contains the fields & tables, plus the most common toolbox items like shapes and text.
Aligning Fields
First, alignment… it’s not an exaggeration to say I use these four tools ALL THE TIME. It is a rare day if I am modifying a report, that I don’t have to use this to line something up to another field.
What is it for? Lining up two or more fields together along one of their “sides”. There are four types, aligning left edges, right edges, top edges or bottom edges. Note: This does not affect the “alignment” of the text within a field, which is what I refer to as “justification”. To alter that requires editing the properties of a text field itself in Drawing Options or applying a format in Report Field Options. More on this later…
How to use it? First, select two or more fields, using the CTRL key to select multiple text objects. Second, click on the Align field of choice, which will align all of the selected fields to the left/right/top/bottom-most object selected. In other words, if I am trying to line up four fields that are the titles of some data, I might use the Top or Bottom alignment to ensure they are on the same horizontal plane. If I have moved some data fields, I might use the Left or Right align tools to line up the title fields to the data fields below. Since there are often title fields in the Page Header (PH) and Report Header (RH) this makes those little tweaks a little easier.
Unlike other report-writing tools, the Align features are all based on the left, right, top, or bottom-most field of a selection, and the order in which the fields are selected does not matter. In some other tools, the Align is based on the first or last field selected, which does not apply here.
Re-sizing Fields
The Size tools are useful in a few circumstances. Typically I use these tools if there are fields where the default size is too big to fit on the report. Often currency fields are very wide, and may not need to be that big. Making them a little smaller width-wise, may allow one to fit more information on a page, or improve the readability of a report.
What is it for? Making two or more fields the same size, either by height or width OR resetting a field to its default size based on the font size it is.
How to use it? Similar to the above Align tools, the first step is to select two or more fields. Then, click on the Size tool. Hovering the mouse over the buttons, a tooltip will display what each one means. Each tool will resize based on the size of the smallest, largest, tallest, or shortest field selected. In other words, if resizing to make fields the same size width-wise, first determine if the goal is to make them smaller to match the least-wide field chosen or wider, to match the widest field chosen.
Similarly to the Align tools, it does not matter which order fields are selected, as it re-sizes based on the smallest, largest, tallest, or shortest field selected,
The “resize to default” option, the middle button of the Size tools, is useful if font sizes have changed but the field did not automatically resize itself. In Drawing Options, when changing font size or style, there is a tickbox called “Resize To Default”. If that is unchecked, the field size itself says the same, and the text is resized. Why does this matter? Well, it doesn’t really, depending on the change but a properly sized field to the text within it is easier to align with other fields. Sometimes increasing the size of a font, and not enabling the Resize To Default option, printing the report will result in text getting cut off. So, this option is there to quickly and easily resize it without having to change the font size or style. Simply select a field, and click the middle button on the Size palette, and it will be resized.
Tiling Fields
This tool is the hardest to explain, and I haven’t used it often. However, there are times when it is useful to quickly space items out, in a columnar type of report layout for instance.
What is it for? This is used to space fields out by a certain number of characters, either horizontally or vertically.
How to use it? Again, select two or more fields. Next, type in the amount of space between the fields to create, with zero being “no space between the fields”. Then, click on the appropriate align button to space things out horizontally or vertically. For instance, let’s say you have a report with five “columns” of information all dollar fields, all approximately similarly sized bits of data in them. They don’t look right on the page right now and you want to try to space them out evenly. Select all of those fields, and play with the Space value to get them spaced out correctly.
- A tip: the fields stay multi-selected when you use this tool, and often it is a guessing game to get the right spacing value. I’m often putting a number in, click on (in this example) Tile Horizontally, and see the results, change the number, click it again, etc. until I find the right value for my spacing needs.
Hopefully, that helps some users out there! The next report writer post will be about Drawing Options and wrapping up the series…