Today’s #TipTuesday post is the third in my series of tips on using SmartLists in Dynamics GP. The first two posts were around the “basics” as I call them and then printing and exporting. Today’s topic is working with columns.
Changing the Column Order & Names
In my first tip post, I showed that it’s easy to resize columns. It’s not “as” easy to re-arrange columns. While some elements of SmartLists are “Excel-like” (such as sorting and resizing a column), there is no “right click – delete column” action available. Changing the columns in any way other than resizing them is done via the Columns button on the toolbar.

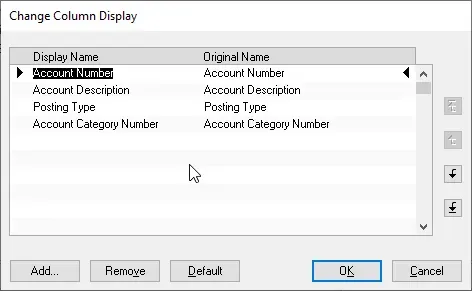
Once a user selects a SmartList and clicks on Columns, they will get the “Change Column Display window.
Ignoring the Add/Remove part for the moment, here are the things a user can do in this window:
1. Column Renaming
Simply type over the Display Name of any column and type in a more intuitive display name if something else would help the users. It’s that easy! Here’s what I would do if it were mine, as an example.
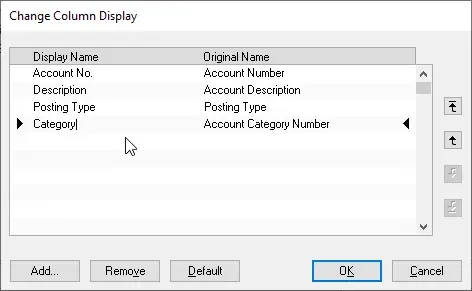
The Original Name is non-editable and will always show the proper column name if it needs to be changed back. To quickly reset the columns back to that list’s default settings, click on the Default button in the window pictured below.

2. Column re-ordering
The second thing a user can do in this window (before I get into Add or Remove) is re-ordering the columns. Unfortunately, there is no drag-and-drop option, nor is there multi-select. To move columns, users must select one by clicking on it and using the arrows on the side to move either to the front or back of the list (far left, far right) or one position at a time up or down the list (which is left or right of course!).
Adding & Removing Columns
The Change Column Display window is also where a user can add or remove columns to a SmartList. Many times the data they want to see is there, it’s just not a “default” column and all they need to do is add it. Here is how to do that (or at least check to see if the column they want is there to be added!).
First, click on Columns on the SmartList toolbar, then click on Add at the bottom. The window that opens is called Columns and by default, it will show what’s defined as “available” columns.
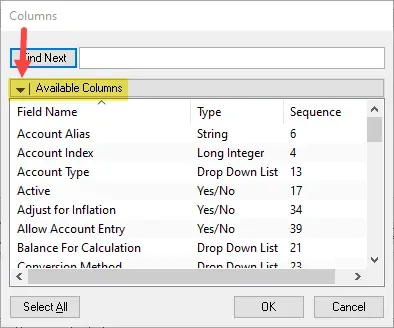
Where I’ve indicated with the arrow is where a user will also find a drop-down list letting them change the display to All Columns.

Depending on the Smartlist, there may not be any difference in the listing here. What a user will see here depends on what the author who built it created. In SmartList Builder, for example, the author has control over what columns will display and be available to choose from.
In many SmartLists, the column names will be friendly enough but at times, it may require the use of some trial and error to see if a particular field contains the data the user wants to see (i.e., add the column then run it and remove the column if it does not contain the desired information).
Adding columns
Here are a few (somewhat random) tips to help a user find what they want:
- Sort by the Type column.
- If the user knows the field they want to add is a list type of field (drop-down list, lookup or multi-select), it’s often listed here as a Drop Down List.
- If they’re looking for a particular date field, look for Date etc.
- Note that not all types make sense though! “Currency” is the type of field identified on things like the Note Index which is a numeric field.
- On the default SmartLists that ship with Dynamics GP, fields that have Account Index in the name are typically the actual GL account number (even though the Type is Long Integer). The table field is an “Index” number but the default SmartLists have been linked to show the GL Account instead, since that makes more sense.
- If that is not what seems to be visible in the list being looked at, check if someone built this particular SmartList Object for the organization, i.e., if it is custom. In SmarList Builder from eOne Solutions, they have a simple tick box that the author can enable to show the GL Account for any “index” field, without linking to a GL Accounts table, no work is required! I wrote about this many years ago in this blog post.
- Use CTRL to multi-select columns to add instead of adding one at a time. Clicking on columns while holding down the CTRL key will keep the previously selected items.
- For those who are used to looking at the tables for data, try sorting the Columns window by Sequence. Typically this sorts the data in table column order, from the main table onwards. Often the fields the user(s) want will then appear in the same order that those users may be used to seeing them in the tables.
Removing columns
To remove a column, click the field in the Columns window, then click the Remove button. To do this slightly more quickly, I will use the ALT key combination and mouse to move faster. What I mean by that is I can see the “v” in Remove is underlined meaning it is the ALT key combination to remove a field. Click on the field, and press ALT+”V” on the keyboard. Repeat.
💡 Since this post was first published, the multi-select functionality is now in the Columns window to be able to select more than one column at a time and then remove them all at once.
A note to “builders” of SmartLists
For those people who are creating SmartLists for end users, please watch out for duplicate fields and help the end user by differentiating them or removing the duplicate data. For example, if I build a SmartList of Sales Transactions for instance, I may want to link to the Customer Master table or other tables. The Customer ID is in multiple tables for linking purposes. The field has the same name in those tables. If I simply added all fields from both tables, I would see Customer ID twice and perhaps not know which one to select. In this example, I would unmark the Customer ID from one of the source tables as I don’t need it twice and it won’t have different data (because it’s a key field).
Another (better) example would be a field like Salesperson or Territory. It’s possible to have a Salesperson or Territory on a customer by default, and just as possible to have overridden it on a particular sale. In my hypothetical example of a SmartList for sales transactions, if I include both fields without differentiating them, the results the user gets could vary significantly by selecting the wrong field. One returns a list of transactions based on who the typical salesperson is, one returns the list of transactions based on who the actual salesperson was on that. If users may want to see both fields, that’s perfectly valid but rename the field (one or both of them for clarity), i.e., Salesperson from Customer, Salesperson from Trx etc.
Most users would see more than one of a given field, not know which to pick or what the difference is, and select one randomly. The results they get may matter, so help them by being clear on where the field comes from.
Well, that’s it for this tip post. Next up I will be covering favorites!