For some reason, out of the box, Dynamics GP Canadian Payroll T4 Forms don’t have the employer’s address. Why? I have no idea… but the information is there to be added easily, and here’s how to add it to the T4 reports for Employer and Employee versions.
Make sure the Employer record is fully set up
The first step is to make sure the company name, business number and address are in the Employer window, as that is where the information on the T4 comes from, for Employer sections. The Employer Name is pulled from the Description field. It would be helpful to call this field “Employer Name” so it’s obvious!
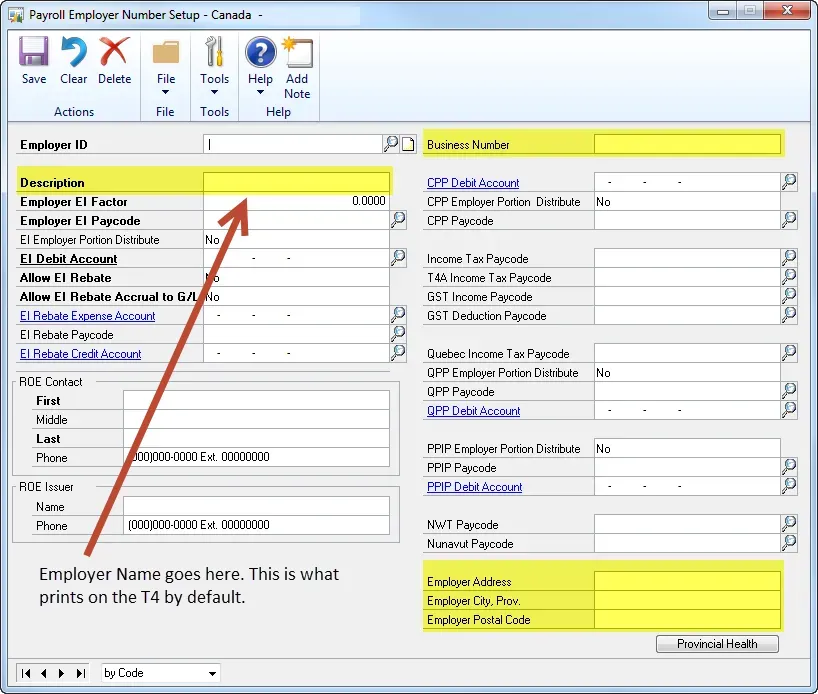
Note: If the company name is too long to fit in the description field, then someone will need to edit the T4 forms regardless to adjust the name. The field size for Employer Description is roughly equivalent to the size of the Employer box width on the form, in the default Courier 12 font.
Open up Report Writer – Canadian Payroll dictionary
I’ll skip the pre-amble about how to use Report Writer and best practices. For those who are new to this, see my Report Writer series from a few years ago for the details. What I’m writing about today assumes users have a working knowledge of Report Writer concepts already.
- First, start with the Canadian Payroll dictionary when opening Report Writer.
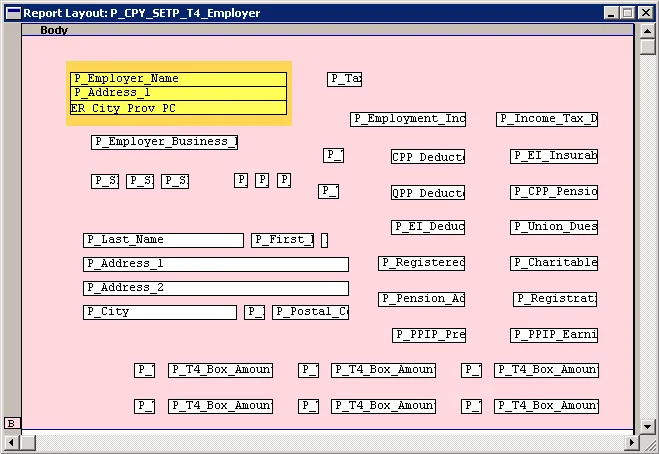
- In the Reports list, if the T4 isn’t already modified, look for “P_CPY_SETP_T4_EMPLOYEE” and “P_CPY_SETP_T4_EMPLOYER” and insert them into the modified reports list. These are the reports in the T4 Print window related to the “Laser Employee” and “Laser Employer/RevCan” options.
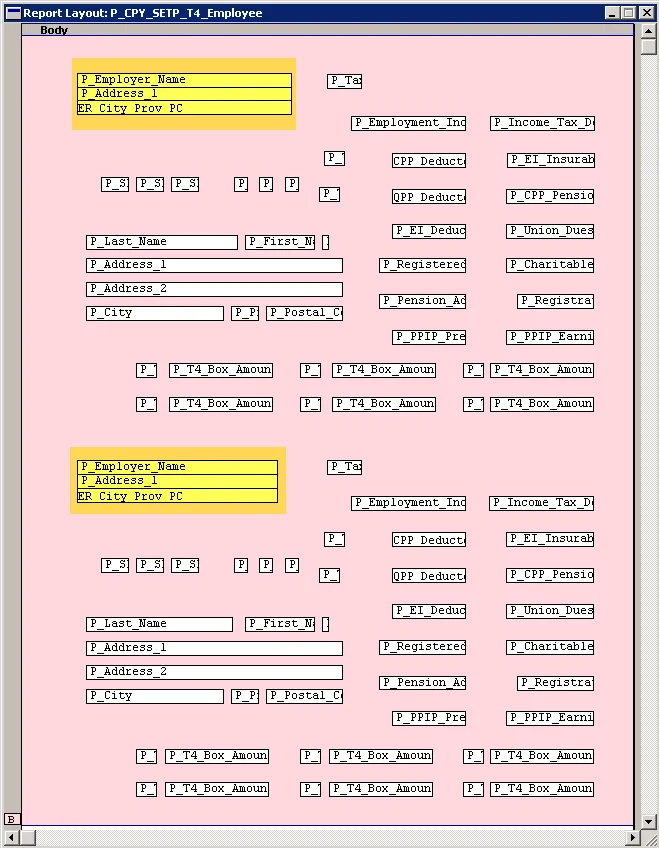
The modifications to add the address are as follows (same basic steps for each, although on the T4 Employee, there are 2 places to add the address).
Field 1: Employer Name
This field is already on the report but if the company name is too long to fit in the field, one might need to replace this text or add a second line of text under the name field for the rest of the company name so it appears on two lines in the forms. If there are multiple companies with payroll, that may not be a viable solution though as it would be hard-coding the name to one company’s name.
Field 2: Address
On the Employer Setup screen and the T4, there isn’t room for a large address block. In this example, I am assuming there is one line for address and one line for City, Province and Postal Code (next step).
- On the Toolbox, select the CDN Payroll T4 Summary Master table from the drop-down list.
- Grab P_Address_1 and drag that field to the report, near the Employer Name. Ignore the fonts and size of the field for now. It’s easier to change multiple pieces of text at the same time after adding the next field.
Field 3: City, Province, Postal Code
Continuing from the above example, on the Toolbox, select Calculated Fields. Create a new calculated field and type String. There is a function for this for multi-line addresses where “address 2” might be blank but in this case, we only really need one formula for City, Province, and Postal Code so it’s easier just to make a new one. Here are the pieces to the formula:
- From Functions, select the STRIP function and click Add.
- Select “CDN Payroll Summary T4 Master” from Resources and “P_City” from Fields and click Add.
- Click outside of the right bracket of the function in the formula and click on the CAT operator (concatenate).
- From Constants, change the type to String and type in a comma and a space and click Add. Or just enter a space and click Add.
- Click on the CAT operator (concatenate).
- From Functions, select the STRIP function and click Add.
- Select “CDN Payroll Summary T4 Master” from Resources and “P_Province_Code” from Fields and click Add.
- Click outside the right bracket of the function and click on the CAT operator.
- From Constants, change the type to String, then type in a space and click Add.
- Click on the CAT operator (concatenate).
- From Functions, select the STRIP function and click Add.
- Select “CDN Payroll Summary T4 Master” from Resources and “P_Postal_Code” from Fields and click Add.
- Click OK, then drag this field onto the report near the Address field.
The end result is something like this (except all on one line!):
STRIP( P_CPY_T4_Summary_1998on.P_City ) # ", " # STRIP( P_CPY_T4_Summary_1998on.P_Province_Code ) # " " # STRIP( P_CPY_T4_Summary_1998on.P_Postal_Code )When modifying the Employee version of the report, drag both fields from the toolbox to the second address block.
Format the Font, Size, and Location of the new fields
My recommendation is to format these fields at the same time by clicking on all of the new fields that are the wrong size or font style while holding the CTRL key. Here’s how I format them quickly:
- Select the new fields (don’t select the employer name field yet, unless there is a new text block for a lengthy company name).
- Click CTRL-D to open the Drawing Options and select “Courier (generic)”. In my case, the size defaulted to 12 which was the same size as the rest of the form’s fonts. Click OK.
- On the Arrange tab of the toolbox, click the button to re-size all of the fields to the narrowest (to make them the same size as the calculated field most likely, in my case, that was the shortest and shorter than the Employer Name field, which is the one we all want to be the same size as).
- Now hold down the CTRL button and click on the Employer Name field and click on the button to make them the same size as the longest field (which should be the Employer Name field). Now they should all be the same size.
- Use the Arrange tab as well to align all of the fields to the same left-hand location of the Employer Name field.
- At this point, the spacing between the fields wasn’t correct on mine and I had to use the arrow keys to adjust the spacing to make the 3 rows of address data spaced evenly.
It should look like this when done:
Final Step: grant security to the modified report
If this was newly modified (i.e., it was not already in the modified reports list), go to Alternate/Modified Reports and Forms and grant access to the Modified version of these reports as appropriate and test them. No other security change is needed, assuming the user(s) who print the T4s already have access to the windows to do so!